Indoor 4x4 Grow Tent Setup Guide
A 4x4 tent packs a grow light, fans and a full canopy into about 100 cubic feet of air. The light adds heat, transpiring plants add humidity, and the exhaust removes both. This guide covers each part in the order you'd set it up, with light and airflow maps from the Bizon planners showing the effect of each choice. Reach out with any questions about your own setup.
The tent
A standard 4x4 tent is 4 feet by 4 feet and about 6.5 feet tall. That's roughly 100 cubic feet of air. With so little air volume, temperature can swing 10°F and relative humidity 20 points within minutes of the light turning on or off.
The room around the tent matters as much as the tent. All intake air comes from that room, so its temperature and humidity set the baseline for the tent. A 60°F, dry room means a cool, dry intake. A damp basement means a damp tent. Choose a location with a steady temperature, a nearby outlet, and a floor that can handle a spill.
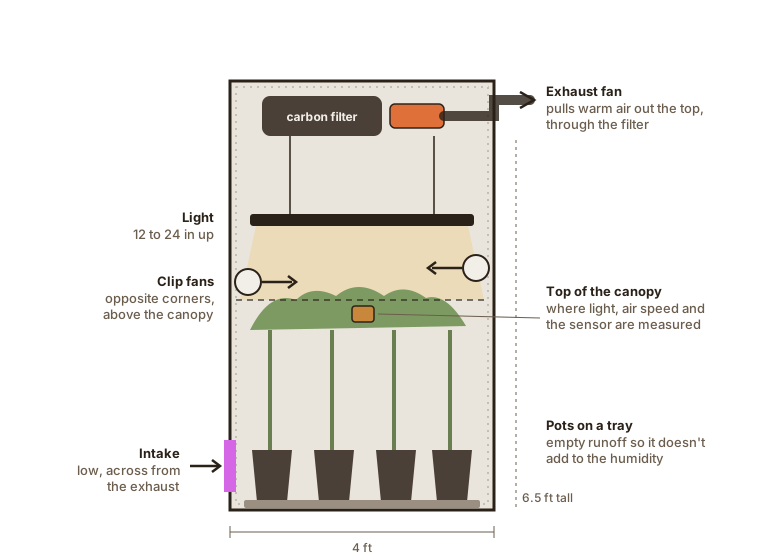
Before you put plants in, zip the tent shut with the light on in a dark room and look for pinholes and gaps at the seams. Light leaks during the dark period can disrupt flowering in photoperiod-sensitive plants. Patch them with foil tape.
Light
Photosynthesis is driven by the photons reaching the leaves, not by fixture wattage. Two measurements describe that light:
- PPFD (photosynthetic photon flux density) is the instantaneous light level at a point, in µmol/m²/s.
- DLI (daily light integral) is the total light delivered over a day, in mol/m²/day. It's PPFD multiplied by the photoperiod.
The PPFD and DLI guide covers both in detail. For a tent, these are common starting points at the top of the canopy:
To hit 900 PPFD across a whole 4x4, you need a light rated around 1,500 to 1,700 µmol/s of PPF. Current LED boards have an efficacy of about 2.5 to 3 µmol per joule, so that's roughly a 550 to 650 watt fixture. Reflective mylar walls return light that would otherwise be lost, so a tent needs less fixture output than an open room of the same size.
Fixture size
Fixture size matters as much as output. Below are two lights with the same output, hung at the same height, in the same tent. Both average about 1,000 PPFD. The full-size board spreads it fairly evenly. The small panel peaks at 2,620 in the center, high enough to photobleach the top growth, while the corners get about a third of that.
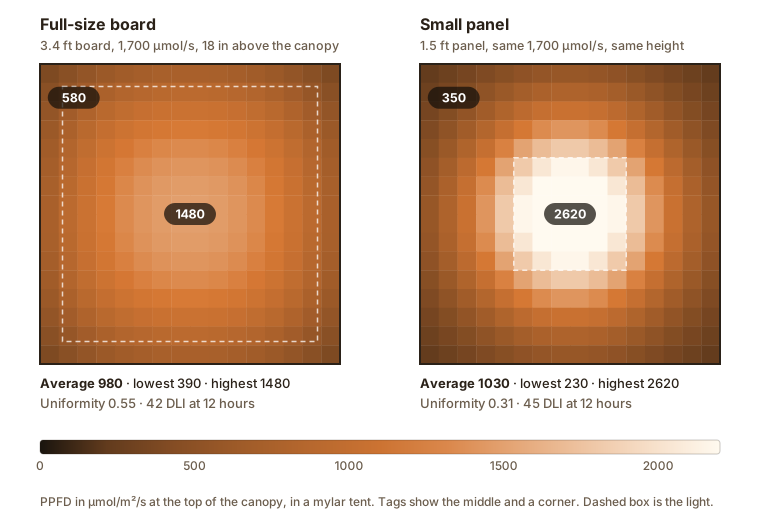
Uniformity is the lowest reading divided by the average. Closer to 1 is more even. The full-size board scores 0.55 and the small panel 0.31. Under the small panel, center plants get too much light and corner plants too little, and no hang height corrects both.
Hang height
Raising a fixture spreads its output over a wider area and lowers peak PPFD. Lowering it does the opposite. In the planner, the same board went from 1,050 average at 12 inches to 840 at 24 inches, with the center dropping much faster than the edges. Start at the manufacturer's recommended height, check the map, and dim the fixture if PPFD is too high. Raising it instead puts it closer to the exhaust fan.
Airflow
A tent needs two kinds of air movement, each with a different purpose.
- Exhaust exchanges tent air with room air. It removes heat, water vapor and odor, and replaces the CO2 the plants use.
- Circulation mixes the air inside the tent. Air moving across the leaves thins the boundary layer, the film of still air on each leaf surface, which speeds transpiration and CO2 uptake.
Exhaust
Mount the exhaust fan and carbon filter at the top, where the warm air collects. Open an intake flap low on the opposite side so fresh air comes in under the canopy and rises through it.
Size the exhaust from the heat of your light. Nearly all of a fixture's electrical input ends up as heat in the tent. A 600 watt light gives off about 2,050 BTU per hour. To keep the tent no more than 10°F warmer than the room, you need about:
2,050 BTU/h ÷ (1.08 × 10°F) = about 190 CFM
Carbon filters and ducting add resistance and reduce a fan's actual airflow, so choose a fan rated higher and turn it down with a speed controller. A 6-inch inline fan on a controller is the usual pick for a 4x4. Set the exhaust to pull a little more air than the intake lets in, so the tent walls bow in slightly. The negative pressure sends odor through the filter instead of out the zippers.
Circulation
The target air speed at the top of the canopy is about 40 to 100 feet per minute, enough to make leaves move slightly. Below that, the boundary layer stays thick and slows gas exchange. Well above it, leaves lose water faster than the roots replace it and can curl.
Where the fans point matters more than how many you have. Below are two layouts in the same tent with the same 6-inch clip fans:
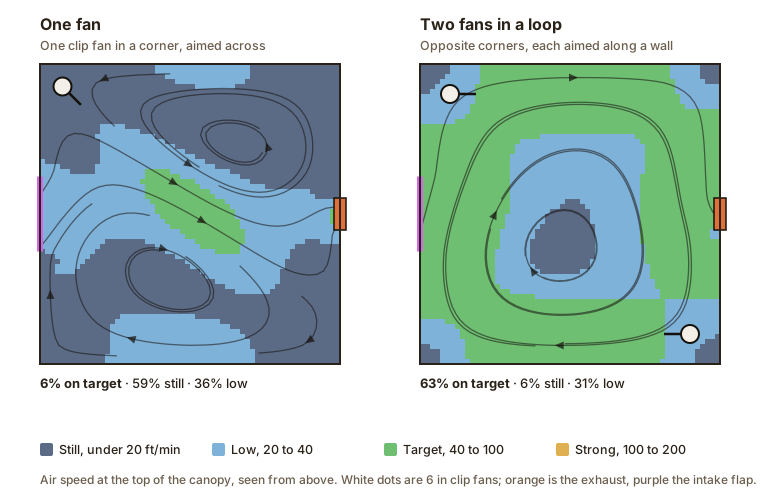
One fan blowing across the tent sends a single stream through the middle and leaves the rest of the canopy still. Two fans in opposite corners, each blowing along a wall, set up a loop that moves air across the whole canopy. The center is the slowest part of a loop, so keep the tallest plant out of the exact middle or raise a fan slightly to reach it.
Side view
The top view shows air speed at the top of the canopy. A side view of the same two-fan loop shows the air above and inside the plants.
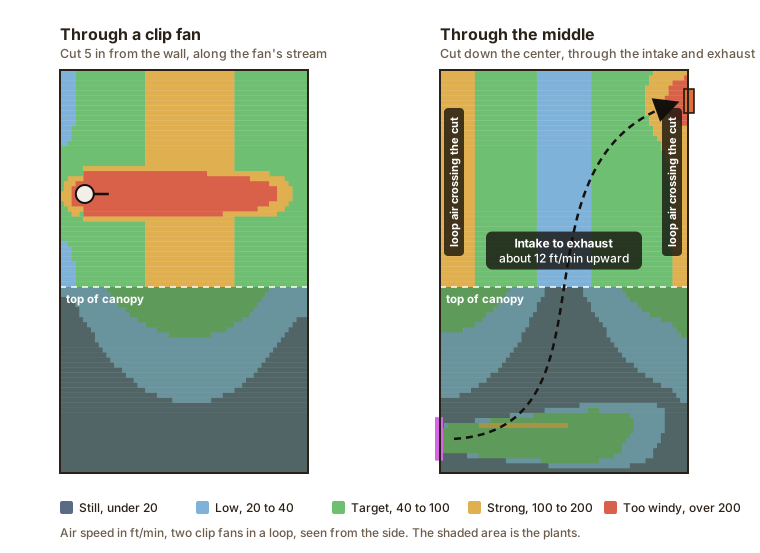
- At fan height, the jet stays above 200 ft/min for most of the tent's width. Aim clip fans over the canopy, not into the nearest plant, and keep them above the tallest tops as the plants grow.
- Inside the canopy, leaves block the air and speed drops to near zero toward the pots. Humidity is highest there. Removing small, shaded lower branches and leaves lets air reach the inner growth.
- At the left and right walls of the middle cut, the strong air is the fan loop running along those walls and across the cut. Neither clip fan is in this slice. The slow strip in the center is the middle of the loop.
- From intake to exhaust, fresh air enters along the floor and drifts up through the plants to the exhaust. A 190 CFM exhaust over 16 sq ft of floor moves air upward at only about 12 ft/min on average. Most of the air speed the leaves feel comes from the clip fans, while the exhaust slowly replaces the air.
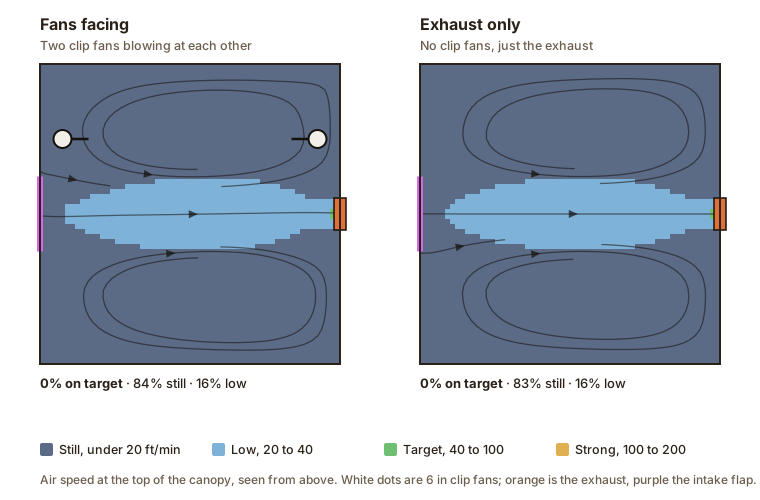
Two fans blowing at each other cancel out, and the canopy ends up about as still as with no clip fans at all. The exhaust adds little circulation. It exchanges the tent's air about twice a minute, but that air moves slowly in a straight line from intake to fan and barely reaches the leaves.
Temperature and humidity
Temperature and humidity together set the VPD (vapor pressure deficit), the drying power of the air, which drives transpiration. Warm, dry air has a high VPD and transpiration is fast. Cool, humid air has a low VPD and transpiration slows. The VPD guide explains it fully. Common starting points:
Under LEDs, leaves usually run a few degrees cooler than the air, because LEDs give off less infrared than older lights. A cooler leaf means a lower VPD than an air-only reading shows. That's why Bizon sensors measure leaf temperature directly instead of estimating it from the air.
Lights off
When the light turns off, the tent cools and relative humidity rises, while the plants are still transpiring. Humidity can jump 10 to 20 points in a few minutes. This is when mold most often starts. Keep the exhaust running at night, and let the temperature fall no more than about 10°F.
Humidity control
- Too dry. Put a humidifier in the tent, aimed away from the leaves, or slow the exhaust. Small plants transpire little, so low humidity is mostly a seedling-stage problem.
- Too damp. Speed up the exhaust first. If the room air is damp too, more exhaust just brings in more damp air. A small dehumidifier inside a 4x4 rarely keeps up and adds heat. A larger unit in the room outside the tent dries the intake air, which works better.
Growing system
Your growing system affects the tent climate. Open water and runoff evaporate into the tent air, and pumps add heat.
How you mix fertilizer also matters. Mixing a reservoir or watering can by hand, running an injector off the tap, and running an injector from a batch tank each change how much standing water is in the tent and how often it's opened. The Fertigation Calculator asks for your fertilizing method and calculates the mix for it.
CO2
Outdoor air is about 420 ppm CO2. Under high light, a full canopy draws CO2 down quickly. In a sealed tent with no exhaust running, it can fall below 300 ppm within minutes, and photosynthesis slows with it. The first CO2 rule for a tent is to keep fresh air coming in. A running exhaust holds the tent near room level.
Enrichment above room level helps only when light is high enough that CO2 limits photosynthesis. In greenhouse studies, raising CO2 from 400 to 1,000 ppm raised photosynthesis by about half under strong light, with little extra past 1,000. Under 600 PPFD or less, extra CO2 does very little. At 900 PPFD or more, it can raise yield.
Mushroom bags
CO2 bags hold mushroom mycelium that releases CO2 as it breaks down its substrate. They're cheap and need no power, which makes them popular for small tents. Their output is small.
In a university test, bags of mycelium settled at about 3 grams of CO2 a day each after the first week. A full 4x4 canopy under a strong light uses roughly 4 to 5 grams an hour. One bag's daily output covers less than an hour of canopy use in a 12-hour light period. With the exhaust running, that CO2 leaves the tent within a minute or two.
Some growers report a few hundred ppm from a bag in a tightly closed tent. Others see almost nothing. If you try one, hang a CO2 sensor at the canopy and compare a week with the bag against a week without it.
Bottled CO2
A tank, a regulator and a controller can hold a tent at 1,000 to 1,200 ppm. It only works if the tent stays closed while CO2 is on, so the exhaust has to run less or only when the controller isn't dosing. That makes heat and humidity harder to control, and many growers add an air conditioner or dehumidifier at the same time. Dose only while the light is on. Plants don't photosynthesize in the dark.
The workplace limit for CO2 is 5,000 ppm averaged over 8 hours. Use a controller with its own sensor so CO2 shuts off at your setpoint. Keep the tank outside the tent, and don't dose a tent in a bedroom or a small closed room where people or pets spend time.
Dashboard
Controller settings show what the equipment is set to. A sensor at the canopy shows the conditions at the leaves. The Bizon dashboard shows each sensor's latest reading, a graph of the history, and an alert when a reading leaves the range you set.
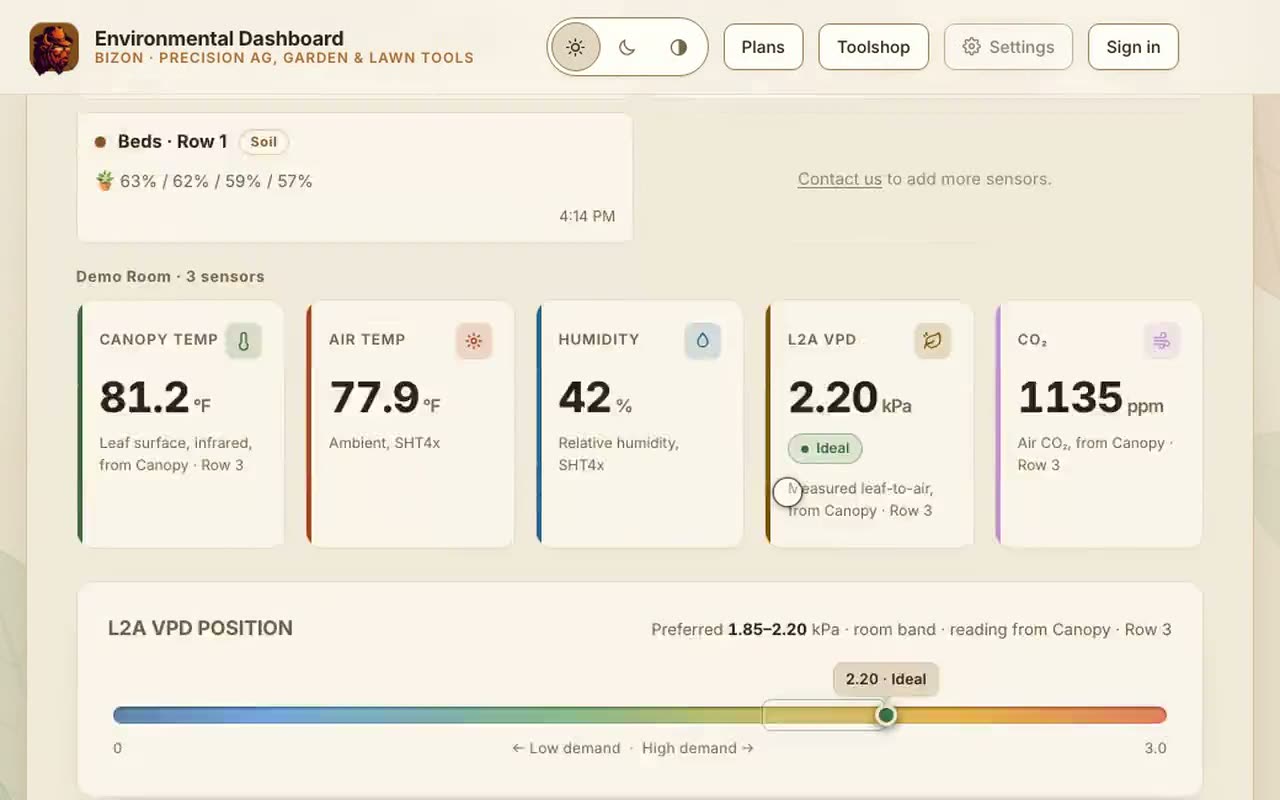
Sensor location
- At the top of the canopy. The upper leaves get the most light and do most of the photosynthesis. Move the sensor up as the plants grow.
- Not in direct light. Direct light heats the sensor and makes it read high. Shade it under a leaf or the sensor's own cover.
- Not in a fan's direct stream. Air straight from a fan doesn't match the air around the leaves.
- Away from the humidifier and the intake. Air near both hasn't mixed with the rest of the tent yet.
Graph patterns
For the first week, watch the trends on the graph more than single readings. The swings at lights on and lights off show whether your exhaust is sized right. A humidity spike after each watering shows how much moisture your growing system adds. A slow climb in temperature over the afternoon usually means the room outside the tent is warming up. Set alerts for high humidity at night, the main mold risk, and high temperature during the day, the main heat stress risk.
Pheno tracking
Plants grown from seed vary in phenotype, even within one pack. Some grow faster, some resist mold better, some yield more. A 4x4 holds only a few plants per run, so when starting from seed, record each plant and keep a cutting of the best one.
The Pheno Tracker keeps a record for each plant: where it came from, scores for the traits you care about, photos, and whether you kept or culled it and why. It prints QR labels for the pots, so you can scan a plant in the tent and pull up its record. Over several runs, even a small tent can narrow a seed pack down to the plants best suited to your setup.
Crop scheduling
A 4x4 is usually run as a flowering space, with young plants grown in a separate area. That way the next crop is ready to move in as soon as the current one is harvested, and the tent is never empty for long.
Plant count
The number of plants that fit depends on how large each cultivar grows and how long you grow it before flowering. Fewer plants need a longer vegetative period to fill the same floor.
Cultivar differences
Cultivars differ in two ways that affect scheduling:
- Stretch. After the switch to 12-hour days, some cultivars barely grow taller and others double or triple in height over the first 2 to 3 weeks.
- Flowering time. Most finish in 8 to 10 weeks of 12-hour days. Some take 12 weeks or more.
Height is the usual limit in a tent. After the filter, the fixture and an 18-inch gap to the light, the top of the canopy needs to stay below about 4 to 4.5 feet from the floor. With a 1-foot pot, that leaves about 3 feet of plant. A cultivar that doubles in height should be switched to flowering at about 1.5 feet, and one that triples at about 1 foot. Note each cultivar's stretch in the Pheno Tracker so the next run can be planned around it.
Next crop
Plants that flower by day length start flowering as soon as they're under 12-hour days, so the next crop can't be started in the flowering tent. It needs a separate veg area on 18 hours of light, such as a 2x2 tent or a shelf with a small fixture. A mother plant of your best cultivar can live there too, as the source of cuttings.
Count back from the expected harvest date. Seeds take about a week to sprout and establish, and cuttings take 1 to 3 weeks to root. For a 9-week flowering cultivar with 4 weeks of veg and 2 weeks of rooting:
With this schedule, the tent produces a harvest about every 9 to 10 weeks instead of every 13 to 15. Autoflowering cultivars, which flower on age instead of day length, can be grown start to finish in the tent on one light schedule, but plants of different ages under one light are hard to light evenly.
Sanitation
Pests, mold spores and root pathogens carry over between crops on surfaces, in water lines and on tools. Clean between every crop while the tent is empty.
Tent
- Empty it. Remove plants, media, fallen leaves and debris. Vacuum the floor and the seams, where spores and pest eggs collect.
- Clean first. Wash the walls, floor, trays and pots with soapy water. Disinfectants work poorly on surfaces still covered in dirt and plant residue.
- Disinfect. Use a product labeled for hard surfaces, such as a hydrogen peroxide or quaternary ammonium disinfectant, or 1 part household bleach to 9 parts water. Keep surfaces wet for the contact time on the label, then rinse. Bleach and peroxide corrode metal, so rinse fixtures and hardware promptly.
- Clean the equipment. Wipe dust off fan blades, grilles and the light's diodes, and replace the carbon filter's prefilter sleeve if it's clogged.
- Dry it. Let everything dry fully before the next crop goes in.
Growing system
- Recirculating hydroponics. Drain the system completely. Scrub the reservoir, buckets and lids to remove biofilm and algae, circulate a labeled sanitizer through the pump and lines, then flush with clean water. Replace airstones, which clog and are hard to clean.
- Drip lines. Flush lines and emitters with clean water. Fertilizer salts build up as scale in emitters, and a dilute acid flush removes it. Follow the product label for the rate.
- Pots and trays. Scrub and disinfect hard pots and trays. Wash fabric pots and let them dry, or replace them.
- Media. Coco and peat mixes are usually replaced after each crop. To reuse expanded clay pebbles, remove the roots, wash the pebbles, soak them in a labeled disinfectant, and rinse. Perlite breaks down with handling and rockwool doesn't clean well, so both are usually replaced. Living soil is reused and re-amended, so it isn't disinfected. Remove the old root balls and keep it covered between crops.
Tools and habits
- Disinfect pruners and scissors between plants with 70% alcohol.
- Keep new cuttings or plants in a separate area for 1 to 2 weeks and inspect them before they go into the tent.
- Don't go straight from an outdoor garden into the tent. Pests and spores travel on clothes and hands.
- Hang yellow sticky cards and check them weekly for fungus gnats, thrips and whiteflies.
Setup order
Set up and run the tent empty for a day or two before plants go in. Problems are easier to fix without plants in the way.
- Place the tent where the room stays steady, and check for light leaks.
- Hang the exhaust and filter at the top. Open an intake low on the opposite side.
- Hang the light and plan its height and dimming with the Grow Light Planner.
- Mount the clip fans in opposite corners, above the canopy, aimed along the walls. Check the layout in the Airflow Planner.
- Place the sensor at canopy height and run the tent for a full day and night. Check the swings on the dashboard.
- Adjust the exhaust speed until lights-on temperature and lights-off humidity stay in range.
- Set up your system in the Fertigation Calculator, then put the plants in.
If something in your tent doesn't match what's described here, reach out with any questions.
Summary
- The room outside the tent sets the starting point for everything inside it.
- Pick a light that covers the whole floor. A small, strong panel makes a hot center and dim corners.
- Size the exhaust from the light's heat: about 190 CFM for 600 W and a 10°F rise.
- Two clip fans in a loop move air across the whole canopy. Fans aimed at each other cancel out.
- Watch humidity at lights off, when mold most often starts.
- Open water, runoff, warm reservoirs and moist living soil all add humidity.
- Fresh air keeps CO2 near room level. Mushroom bags add very little. Bottled CO2 needs a closed tent and a controller.
- Measure at the canopy, out of direct light and fan streams.
- Start the next crop in a separate veg area 5 to 6 weeks before harvest, and flower each cultivar early enough to allow for its stretch.
- Clean, disinfect and dry the tent and the growing system between every crop.
Sources
The light and air maps, including the side view, come from the Bizon Grow Light Planner and Airflow Planner, using a 4x4 x 6.5 ft mylar tent, a 1,700 µmol/s light at 18 inches, 6-inch clip fans at 150 CFM, and a 4-inch exhaust at 190 CFM. The planners list their own sources. The exhaust figure uses the standard sensible heat formula, BTU/h = 1.08 × CFM × °F rise, and 3.412 BTU/h per watt. Canopy CO2 use is worked from a net canopy rate of about 20 to 30 µmol/m²/s over 1.49 m².
- University of Arizona, "Carbon Dioxide Enrichment of Controlled Environment Plant Chambers via Specialty Mushroom Cultivation" ↗, SARE project GW20-210. CO2 output of mycelium bags, about 2.6 to 3.3 g per day after two weeks.
- "Light-Mediated Reduction in Photosynthesis in Closed Greenhouses Can Be Compensated for by CO2 Enrichment in Tomato Production" ↗, Plants (2021). Photosynthesis gains from 400 to 1,000 ppm CO2 under strong light.
- UMass Extension, "Cleaning and Disinfecting the Greenhouse" ↗. Cleaning before disinfecting, and alcohol for tools.
- University of Kentucky, PPFS-GH-07, greenhouse sanitation ↗. Sanitizing between crops, the 1 to 9 bleach dilution, and rinsing after contact.
- NIOSH, "Pocket Guide to Chemical Hazards: Carbon dioxide" ↗. OSHA limit of 5,000 ppm over 8 hours.
Keep reading
Mulder's chart
The nutrient interaction wheel, with a source for each line. Tap a nutrient to see what it blocks, what it helps, and which lines have no evidence.
14 min read NutritionCalcium disorders
Blossom-end rot and tipburn are calcium problems caused by slow transpiration more often than by too little calcium in the feed. Causes and fixes for tomatoes and lettuce.
4 min read IndexAll Bizon guides
Everything published so far, and what is being written next.
Browse the guides